EASY Tips For Photorealism in 3D | Improve Your Realistic Rendering
Want to know how to create photorealistic images? In this article, I’ll show you 6 quick tips for increasing photorealism in your 3D scene. I will be demoing with V-Ray for 3ds Max but most of these tips will be useful for any 3D artist in any 3D software.
Part of the reason that 3d rendering is getting more and more realistic every year is due to more computing power. Everything you see in a 3d rendering is made up of polygons. More computing power means we can render more polygons than ever before. More polygons mean more details and more details mean more photorealistic models.

COMPUTER POWER > MORE POLYGONS > MORE REALISTIC
Our job in 3d graphics is to convince the viewer that what they are looking at is real. We are modern-day magicians just with a whole lot of tech and computer power. But the tech and power alone won't cut it... so let's take a look at 6 tips to convince your viewers your visuals are real...
1. Life's Not Perfect
The most obvious giveaway that an image is a 3D render is that it's too perfect. In this image, the pictures chairs and table are all dead straight. There is no way you could do this in reality if you tried.
So a good thing to do before render time is to rotate and move things about ever so slightly. Just note that we usually do this with Snaps by degree on, so it rotates by 1 degree or 5. But now is a good time to turn this of and make very small rotations and movements.
You can see the difference when we compare these 3d renders.

If you want to explore adding more chaos to your 3d renderings, check out the Physics video where we look at stacking objects and using gravity, wind, and explosions to randomise placements of objects.
2. Same Same But Different
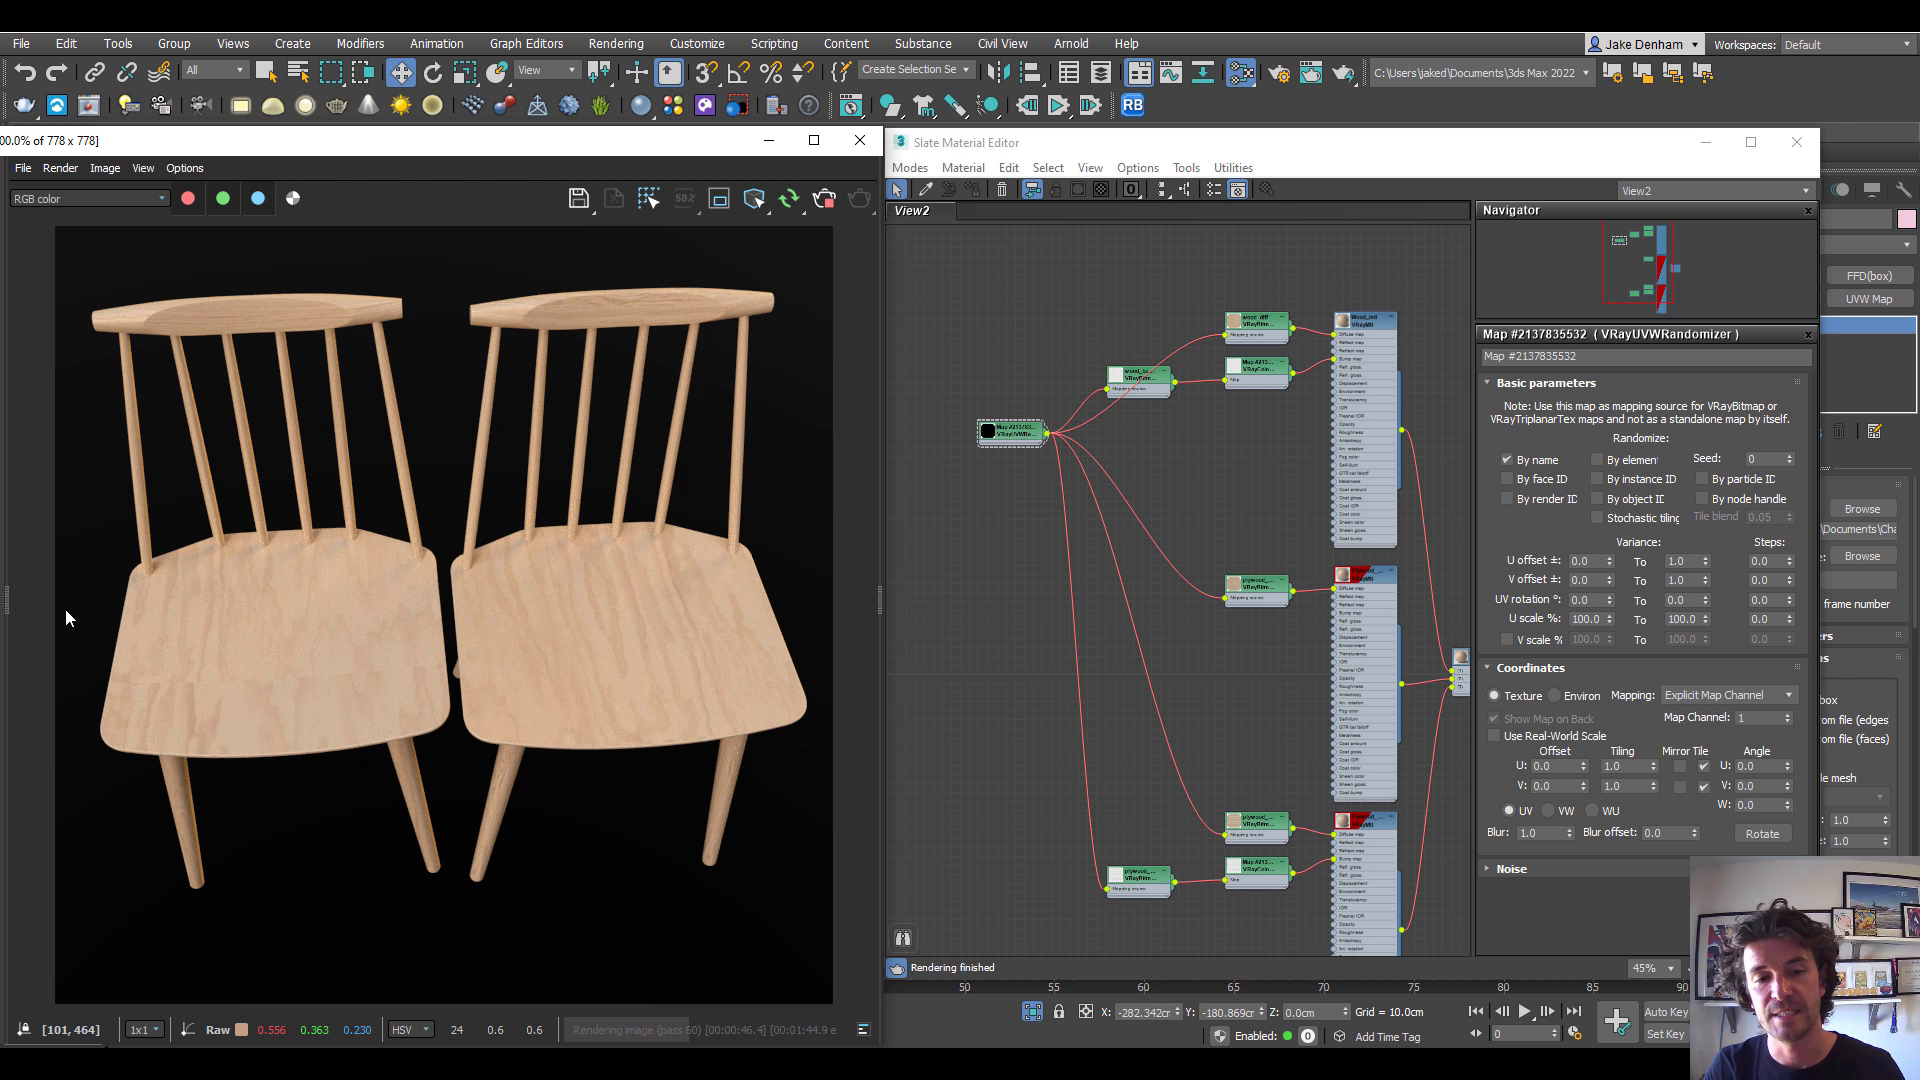
Using the same model is cool and all but when you have a few lined up you are going to start noticing that they are all exactly the same. In this example, we can see that the wood grain is in the same place on each chair.

This can be easily solved, even if the objects are instanced. Go into the material editor. Grab the material using the eyedropper. Add a VRayUVWRandomizer map. Plug the same one into all of the maps. You can choose by name and this will offset the texture depending on the name. Turn off the UV Rotation as we do not what the texture to rotate. And now each chair will have varied textures
3. Go Hard Or Go Home
Another giveaway that something is a 3d model is the hard edges. When we build in 3d the edges are hard by default. We can overcome this in a couple of ways. The first way is with the Chamfer modifier.
The second way is by doing it in the material with a map. Add a VrayEdgeTex Map. And we can see that has rounded the corners for us, making a more photorealistic model.

4. Make Some Noise
Nothing in life is really flat, so nor should your 3d models. To add some variation you can Quadify Mesh. This will add some more faces to your object and then add a noise modifier. Try not to overdo this one you barely want to notice it.

5. Go Organic
It's not just hard objects that we can soften up. Years ago natural objects such as trees, plants, flowers, pillows and fabric were hard to make look realistic in 3d renders because we had so few polygons to play with.
But now we have more than enough to make things look as real as real life. With Chaos cosmos now there is no need not to have a few organic objects to your scene.

Adding a throw and positioning it with a FFD modifier is going to add realistic details. Or you can use the cloth modifier to do something similar.

Talking of the cloth modifier, we can combine the cloth modifier with cushions to drop them onto the sofa. This will make it sit nicer than if we just try to place it.
Watch the video below for the steps…
6. Keeping It Real
Keeping things real is important if you want your 3d renders to look real. This goes for lights, materials, and cameras. If you use real-world constraints in your 3d images you will get real-world results. The closer to reality our virtual world is the more realistic it will seem.
This is why it is a good idea to keep materials on a real-world scale. In the V-Ray Asset Browser keep Real World on. Then whenever we create an object and add a UVW Mapping modifier with real-world on, it will all come in at the correct scale. This is a really useful habit to get into if you want photorealistic images.

Real-world means we are telling 3ds max that this texture is 100cm x 100cm in real life.

This goes for models too. Just eyeballing and scaling is pretty lucky dip and I would avoid this where possible. Most models available now are modelled to real-world size. But if they are not to real-world you can always check the manufactures website and make sure you are matching the exact dimensions.
There are many other things that will affect your ability to create photorealistic images, high-quality materials, realistic details, image resolution, etc... But creating cutting-edge photorealistic 3D images is no longer reserved for 3D professionals with advanced software or the graphics guru. Check out the Learn 3D page for a simplified look at creating 3d renders

Render On!
